Python script to delete Facebook photos with Selenium

Introduction
This tutorial teaches you to write a Python script to delete Facebook photos with Selenium.
In the beginning, the script logs into your Facebook account. Then it scrolls through all the photos to collect the URLs for later processing.
In the next step, it opens each photo at full width and clicks on the menu to find the Delete Photo button. Finally, it confirms the deletion.
Note: This tutorial doesn’t teach you the basics of Python and Selenium.
Step 1: Install the dependencies
The pip utility helps install Python packages required to run a project. It’s not installed by default in many distributions.
Install pip in Debian-based distributions
To install pip in Ubuntu, Debian type:
sudo apt-get install python3-pip
Install pip in Fedora, Centos
To install pip in Fedora type:
sudo dnf install python3-pip
To install pip in CentOS type:
sudo yum install python3-pip
Install pip in Windows
Windows users can install the pip utility via a Python script.
To download the get-pip.py script type:
curl https://bootstrap.pypa.io/get-pip.py -o get-pip.py
To install pip in Windows run the get-pip.py Python script.
python3 get-pip.py
Install selenium inside a virtual environment
Since our script uses Selenium to delete Facebook photos, you have to install it inside your coding environment.
In both Windows and Linux to create a virtual environment type:
python3 -m venv fb
The above command creates a virtual environment named fb. Choose any name you want.
To activate the virtual environment in Windows type:
fb\Scripts\activate
To activate the virtual environment in Linux type:
source fb/env/bin/activate
To install selenium in Windows or Linux type:
pip install selenium==3.8.1
Note: I wrote the script with Selenium 3.8.1, but feel free to experiment with different versions.
Step 2: Create the script
Open a new Python script and import the following utilities.
from selenium import webdriver
from selenium.webdriver.support.ui import WebDriverWait
from selenium.webdriver.common.by import By
from selenium.webdriver.support import expected_conditions as EC
import time
import argparse
The following explains the reasons for including them in the script.
- webdriver is required to launch the browser engine behind the automation.
- WebDriverWait is used to wait for page resources that take time to load.
- By is used to write an expression for the location of different HTML elements.
- EC helps to specify the expected condition, like waiting until the menu is clickable.
- time helps wait for the HTML elements to load inside the page and avoid blocking from Facebook.
- argparse is used to parse command-line arguments.
Define the webdriver, pause time for scrolling through the photos, and the WebDriverWait object as top-level module variables.
# define the webdriver object
driver = webdriver.Firefox()
# define scroll pause time
scroll_pause_time = 0.5
# define wait
wait = WebDriverWait(driver, 4)
For now, the script supports only the Firefox web browser. Adjust the above time constants according to your needs.
The photo_page is a constant that stores the link to the album of photos. For the moment hardcode it in the script like shown below. Later you will learn how to parse it from the command line.
photo_page = "url_of_your_photo_page"
Define the following variables.
collect_photos = True
total_photos = 0
photo_urls = []
- collect_photos is a boolean set to True by default. It controls the while loop that collects links to photos.
- total_photos keeps track of the number of deleted photos.
- photo_urls is a Python list that stores the links to photos.
Define a section for the HTML elements which you can later reference in Selenium calls.
# html elements vars
menu_string = "//div[contains(@aria-label, 'Actions for this post')\
   and @role='button']"
Read the Facebook username and password from a text file.
# parse username and password
with open(creds, "r") as creds:
    lines = creds.readlines()
    plain_username = lines[0].strip()
    plain_password = lines[1].strip()
The with statement guarantees that the file is closed once Python has finished reading it. The creds variable will be parsed from a command-line argument.
Step 3: Log into Facebook with Python and Selenium
Open the Facebook site with the help of the driver you have defined.
# login to facebook with Selenium
driver.get("http://www.facebook.com")
Before logging into Facebook you need to locate the form elements. The Selenium’s webdriver instance has many methods to find HTML elements within the DOM. One of them is the find_element_by_id method. An inspection of the components of the form helps to find out the IDs of each.
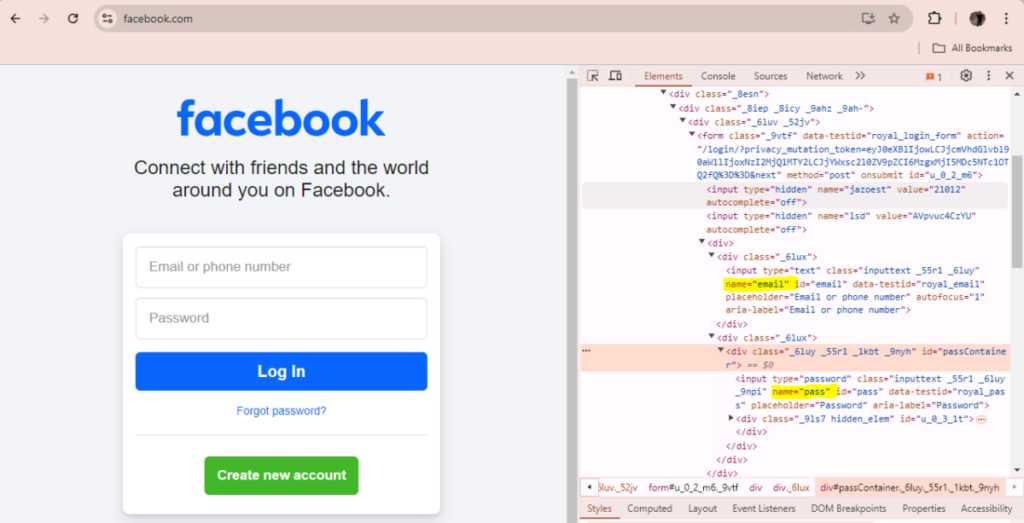
We can then use the IDs and names to locate the HTML form fields with Selenium.
# target username, password, login button
username = driver.find_element_by_id("email")
password = driver.find_element_by_id("pass")
login_button = driver.find_element_by_name("login")
Fill out the Facebook’s login form with the username and password.
# enter username and password in the Facebook login form
username.clear()
username.send_keys(plain_username)
password.clear()
password.send_keys(plain_password)
The .clear() method cleanses the input field.
Click on the Login button.
login.click()
Put the script to sleep after logging into Facebook.
time.sleep(0.5)
Step 4: Collect the URLs of the photos on Facebook
Selenium can be used to scroll through a dynamic page. The while loop helps fetch the URL for each photo and store it inside the photo_urls list.
The end of the dynamic page is calculated by an authentic string in the URL of the last photo. You must identify this manually. The URL format of the Facebook photo is shown below.
https://www.facebook.com/photo.php?fbid=1457511254507689&set=pb.100007464855050.-2207520000&type=3
The fbid string can be used as a unique identifier to inform the script about the end of the page and break the while loop.
First retrieve the page that contains the photos.
# open the photos section and start collecting photo links
driver.get(photo_page)
The code with the Python while loop is shown below.
while collect_photos:
    time.sleep(scroll_pause_time)
    driver.execute_script("window.scrollTo(0, document.body.scrollHeight);")
    anchors = driver.find_elements_by_tag_name("a")

    for a in anchors:
        try:
            url = a.get_attribute("href")
            if url is not None:
                if "photo.php?fbid=" in url and url not in photo_urls:
                    photo_urls.append(url)
                    if "1457511254507689" in url:
                        collect_photos = False
                        break
                else:
                    continue
        except:
            pass
In the above code, we scroll down the Facebook page to load the photos and store the URLs inside the photo_urls Python list. The while loop runs as long as the boolean variable collect_photos equals True.
When the Python script reaches the last photo it adds its URL to the list and sets the collect_photos to False.
Step 5: Create the delete_photo function
Once the Python script has collected all the URLs of the photos, it runs a for loop on the photo_urls list to delete them.
Before executing the for loop, define the delete_photo function. The code inside this function locates the following elements.
- The menu of the photo.
- The Delete Photo button.
- The button for confirming the deletion of the photo.
# function to delete photo based on photo link
def delete_photo(photo_link):
    driver.get(photo_link)
    wait.until(EC.element_to_be_clickable((By.XPATH, menu_string))).click()
    # Find the Delete photo button by text
    time.sleep(2)
    el = driver.find_elements_by_xpath(
        "//*[contains(text(),\
      'Delete photo')]"
    )
    el = el[0]
    el.click()

    # click on Delete to confirm
    confirm_del = driver.find_elements_by_css_selector("[aria-label=Delete]")
    confirm_del[1].click()
It first uses the webdriver instance to retrieve the photo in full width and height. Then with the help of Selenium’s WebDriverWait, the script waits for the menu of actions on the photo to be clickable.
We have imported expected_conditions as EC at the top of the script. The WebDriverWait makes use of the specific conditions provided by EC.
- title_is
- title_contains
- presence_of_element_located
- visibility_of_element_located
- visibility_of
- presence_of_all_elements_located
- text_to_be_present_in_element
- text_to_be_present_in_element_value
- frame_to_be_available_and_switch_to_it
- invisibility_of_element_located
- element_to_be_clickable
- element_to_be_selected
- element_located_to_be_selected
- element_selection_state_to_be
The EC.element_to_be_clickable is of interest to us. In the above code, Selenium waits a maximum of four seconds for the menu of actions to be clickable.
You can easily change the time to wait inside the definition of the WebDriverWait object.
wait = WebDriverWait(driver, 4)
As you can see the time module is being used inside the above function. It helps to freeze the time so the page resources are fully loaded for the script to process them.
Step 6: Write the for loop to delete Facebook photos in bulk with Python and Selenium
After the script has finished collecting the URLs, run a for loop through them and execute the delete_photo function.
# run delete_photo on each photo link
for photo in photo_urls:
time.sleep(args.timedelta)
start_time = time.time()
delete_photo(photo)
end_time = time.time()
total_photos += 1
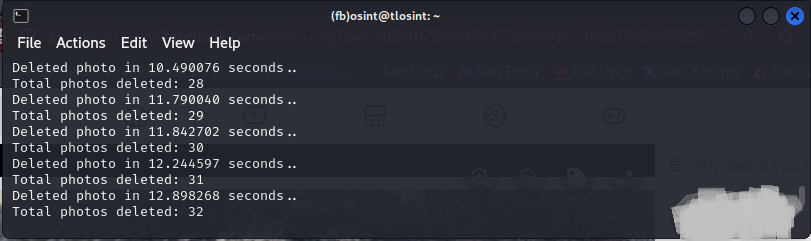
print("Deleted photo in %f seconds.." % float(end_time - start_time))
print("Total photos deleted: %d" % total_photos)
Step 7: Add a command-line interface to your Python script
A command line interface helps to specify arguments directly from the command line. In our case we can specify:
- URL of the photo album to delete.
- the time delay between each delete.
- the file that stores the username and password to log into Facebook.
argparse is the default Python library used to build a command-line interface. Import argparse and define the ArgumentParser directly down the Python import statements.
import argparse


cli_parser = argparse.ArgumentParser(description="Deletes facebook photos in bulk.")
To add a new argument use the add_argument method.
cli_parser.add_argument("--time-delta", dest="timedelta", type=float, default=0.8)
cli_parser.add_argument(
    "--photo-album",
    dest="album",
    type=str,
    help="Link of photos you want to delete",
    required=True,
)
cli_parser.add_argument(
    "--credentials",
    dest="credentials",
    type=str,
    help="Text file to store username and password.",
    required=True,
)
The above code defines three arguments. To access the command-line arguments inside the Python script call the parse_args() method shown below.
args = cli_parser.parse_args()
The dest specified inside the add_argument method can be used to access the value of the argument.
args = cli_parser.parse_args()
creds = args.credentials
photo_page = args.album
Now you can specify the time to wait between each deletion, the photo album URL, and the credentials file directly from the Windows command prompt or the Linux terminal.
The final script
Although there may be minor differences in your code compared to mine, you should end up with something similar to the script below.
from selenium import webdriver
from selenium.webdriver.support.ui import WebDriverWait
from selenium.webdriver.common.by import By
from selenium.webdriver.support import expected_conditions as EC
import time
import argparse


cli_parser = argparse.ArgumentParser(description="Deletes facebook photos in bulk.")
cli_parser.add_argument("--time-delta", dest="timedelta", type=float, default=0.8)
cli_parser.add_argument(
    "--photo-album",
    dest="album",
    type=str,
    help="Link of photos you want to delete",
    required=True,
)
cli_parser.add_argument(
    "--credentials",
    dest="credentials",
    type=str,
    help="Text file to store username and password.",
    required=True,
)

# instantiate webdriver interface
driver = webdriver.Firefox()
# define scroll pause time
scroll_pause_time = 0.5
# define wait
wait = WebDriverWait(driver, 4)

args = cli_parser.parse_args()
creds = args.credentials
photo_page = args.album
collect_photos = True  # bool to run photo link collection
total_photos = 0  # total counter of deleted photos
photo_urls = []  # list to store the collected photo urls

# html elements vars
menu_string = "//div[contains(@aria-label, 'Actions for this post')\
   and @role='button']"


# parse username and password
with open(creds, "r") as creds:
    lines = creds.readlines()
    plain_username = lines[0].strip()
    plain_password = lines[1].strip()


# login to facebook
driver.get("http://www.facebook.com")


# target username, password, login button
username = driver.find_element_by_id("email")
password = driver.find_element_by_id("pass")
login_button = driver.find_element_by_name("login")

# enter username and password in Facebook's login form
username.clear()
username.send_keys(plain_username)
password.clear()
password.send_keys(plain_password)

# click on login button
login_button.click()

time.sleep(0.5)  # does this work?

# open the photos section and start collecting photo links
driver.get(photo_page)
while collect_photos:
    time.sleep(scroll_pause_time)
    driver.execute_script("window.scrollTo(0, document.body.scrollHeight);")
    anchors = driver.find_elements_by_tag_name("a")

    for a in anchors:
        try:
            url = a.get_attribute("href")
            if url is not None:
                if "photo.php?fbid=" in url and url not in photo_urls:
                    photo_urls.append(url)
                    if "1457511254507689" in url:
                        collect_photos = False
                        break
                else:
                    continue
        except:
            pass


# function to delete photo based on photo link
def delete_photo(photo_link):
    driver.get(photo_link)
    wait.until(EC.element_to_be_clickable((By.XPATH, menu_string))).click()
    # Find the Delete photo button by text
    time.sleep(2)
    el = driver.find_elements_by_xpath(
        "//*[contains(text(),\
      'Delete photo')]"
    )
    el = el[0]
    el.click()

    # click on Delete to confirm
    confirm_del = driver.find_elements_by_css_selector("[aria-label=Delete]")
    confirm_del[1].click()


# run delete_photo on each photo link
for photo in photo_urls:
    start_time = time.time()
    delete_photo(photo)
    time.sleep(args.timedelta)
    end_time = time.time()
    total_photos += 1
    print("Deleted photo in %f seconds.." % float(end_time - start_time))

    print("Total photos deleted: %d" % total_photos)
Delete your Facebook photos with Python
To activate the Python virtual environment in Linux type:
source fb/bin/activate
To activate the Python virtual environment in Windows type:
fb/Scripts/activate
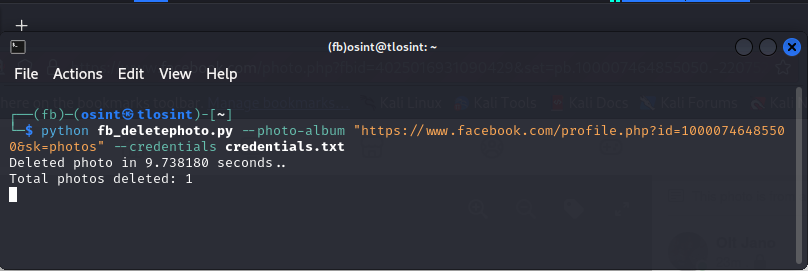
To run the Python script type:
python fb_deletephoto.py --photo-album https://www.facebook.com/profile.php?id=100007464855050&sk=photos --credentials credential.txt
Note: Make sure to specify the URL of your album with the –photo-album argument.
To specify the time wait between each deletion type:
python fb_deletephoto.py --photo-album https://www.facebook.com/profile.php?id=100007464855050&sk=photos --time-delta 3.0 --credentials credential.txt
Final thoughts
Automation is beneficial when you have to process a lot of data. The script performs without interruption until Facebook detects it as a robot.
As soon as Facebook removes the temporary block, rerun the script and let it purge photos while you enjoy some drink.
© 2024 Copyright by awakenerd.com
All Rights Reserved