How to free up space on Ubuntu
Ubuntu’s APT package caching mechanism, unnecessary package dependencies, old snaps and duplicates take a lot of disk space on your machine. Through this tutorial you will learn how to free up disk space on Ubuntu by taking rid of them.
To find out how much disk space is currently being used on Ubuntu type:
df -h

After completing the steps below you can run the above command again and see for yourself how much space is gained.
Step 1: Remove APT’s cached packages
Ubuntu stores the downloaded packages in the /var/cache/apt/archives when you install new software via APT. This is useful in case you may want to reinstall a package in the future, but it consumes a lot of disk space over time.
To find out the space your cached packages are taking on Ubuntu, type:
sudo du -sh /var/cache/apt/archives

As you can see from the above picture, the cached packages are taking close to 800 Megabytes on my Ubuntu. To remove the APT’s cached packages on Ubuntu, type:
sudo apt-get clean
To check if the cached packages by APT are deleted, type:
sudo ls -Ra /var/cache/apt/archives
On success, the above command should return an empty list.
Step 2: Clean the thumbnail cache
Ubuntu stores thumbnails of your images, videos, ebooks, and other multimedia files inside the ~/.cache/thumbnails directory. If you work with graphics and video, your Ubuntu’s thumbnail cache will grow huge over time.
To clean the thumbnail cache on Ubuntu, type:
sudo rm -rf ~/cache/thumbnails/*
Step 3: Remove unnecessary packages
Unnecessary packages in Ubuntu consist of dependencies that are no longer required. When you use the apt-get remove command, only the specified package is purged. So anytime you uninstall a package on Ubuntu, its dependencies are left untouched, consuming disk space.
To automatically remove unwanted package dependencies on Ubuntu, type:
sudo apt-get autoremove
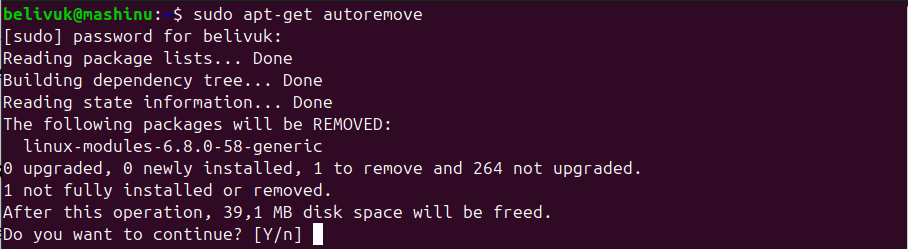
As you can see from the above image, the apt-get autoremove command collects all unnecessary dependencies and asks if you want to continue removing them. Type Y without hesitation and hit Enter.
Step 4: Remove old snaps
Snap keeps older versions of packages in case of a rollback. Not in use, the disabled snap packages consume disk space.
To find the size of snap packages on Ubuntu, type:
sudo du -sh /var/lib/snapd/snaps

To list installed snap packages on Ubuntu, type:
sudo snap list --all
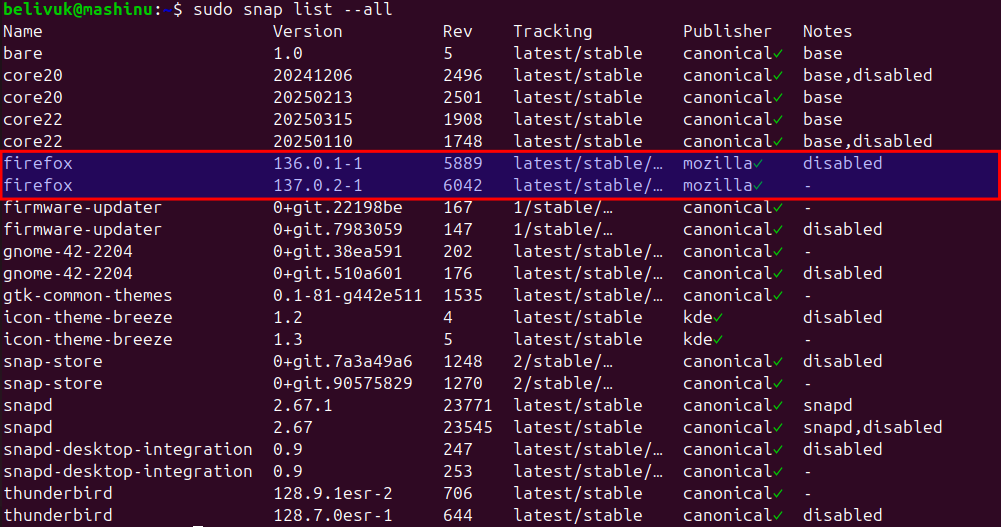
As you can see from the above picture, there are two versions of the Firefox snap package. The older version is disabled.
To remove the older version of a snap package on Ubuntu, type:
sudo snap remove firefox --revision=5889
As you can see from the above command, you specify the name of the snap package that you want to remove and its revision ID, which you take from the Rev column in the above output.
Removing each one of the snap packages manually is not only impractical, but it is also time-consuming. The following bash script finds all disabled snap packages and removes them.
Save the following code as a shell script, for example, oldsnaps.sh.
# Removes old revisions of snaps
# CLOSE ALL SNAPS BEFORE RUNNING THIS
set -eu

snapsToRemove=$(LANG=en_US.UTF-8 snap list --all | awk '/disabled/{print $1, $2, $3}')

while read snapname version revision; do
    if [[ "$revision" == *[a-zA-z]* ]]; then
        # Version field is empty. Revision is in second field
        revision=$version
    fi
        snap remove "$snapname" --revision="$revision"
done <<< $snapsToRemove
Then, to make the oldsnaps.sh script executable, type:
sudo chmod +x oldsnaps.sh
To run the above shell script, type:
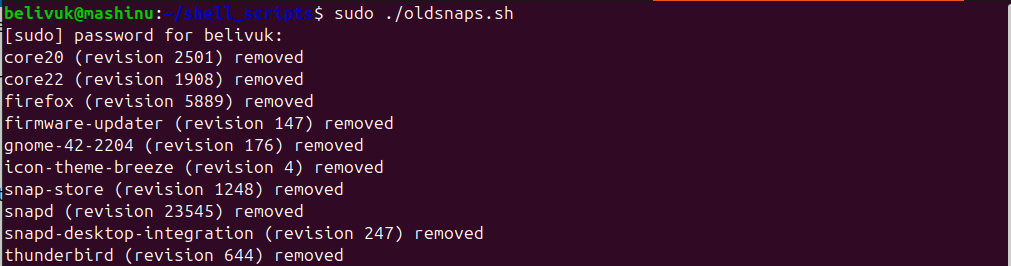
sudo ./oldsnaps.sh
To find out the new size of the installed snap packages, type:
du -sh /var/lib/snapd/snaps
As you can see from the following picture, I got back 1.2 gigabytes by just removing old snap packages on Ubuntu.

Step 5: Remove journal logs
Ubuntu stores logs from various source such as the kernel, system and apps inside a journal. With time the journal logs consume a lot of space on Ubuntu.
To find the size the journal logs are taking up on Ubuntu, type:
sudo journalctl --disk-usage
The above command gives the information below.
Archived and active journals take up 458.9M in the file system.
To diminish the size of journal logs on Ubuntu, type:
sudo journalctl --vacuum-time=1d
The above command frees disk space by deleting everything but the journal logs for the last day, and returns the following message.
Vacuuming done, freed 434.1M of archived journals from /var/log/journal/a0a8a8d60b2947758a3b21de3368193c.
The vacuum feature has other parameters such as:
- -vacuum-size=BYTES can be used to reduce disk usage below the specified size.
- -vacuum-files=INT can be used to leave only the specified number of journal files.
To create a cron job to automatically run the journal logs vacuum cleaner on Ubuntu, type:
sudo crontab -e
Then copy and paste the following line.
30 18 * * 6 sudo journalctl --vacuum-time=1d
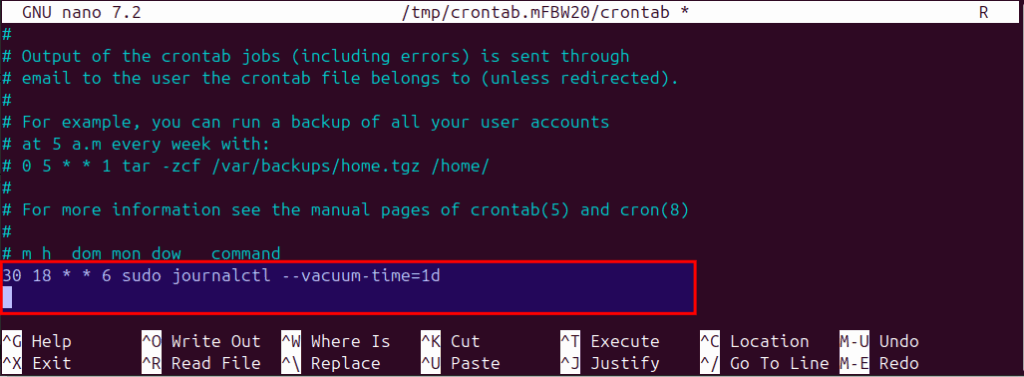
Save the above file with your text editor. In my case, I am using Nano, so CTRL + O to write the changes and CTRL + X to exit.
The above cron job runs the vacuum cleaner for journal logs on Ubuntu every Saturday at 18:30. Feel free to adjust the time to meet your specific needs.
Step 6: Remove the browser’s cache
Firefox
To clear Firefox’s cache files on Ubuntu, type:
rm -rf ~/.cache/mozilla/firefox/*
To clear Firefox’s browsing history on Ubuntu, type:
rm ~/.mozilla/firefox/*release/*.sqlite
Google Chrome
To clear Google Chrome’s browsing history on Ubuntu, type:
sudo rm -rf ~/.cache/google-chrome
Step 7: Remove duplicate files
Over time, you end up downloading the same files. To find and remove duplicate files on Ubuntu, use fdupes.
To install fdupes on Ubuntu, type:
sudo apt-get install fdupes
To find and delete duplicates with fdupes on Ubuntu, type:
fdupes -rd ~
The above command searches for duplicates in your home directory on Ubuntu and presents them as sets in an interactive prompt. You can select which file to preserve and which one to delete.
Step 8: Empty the trash
When you delete files through GUI on Ubuntu it doesn’t remove them permanently. Instead it stores them inside the ~/.local/share/Trash/ in case you decide to restore and keep them.
To empty trash on Ubuntu, type:
rm -rf ~/.local/share/Trash/*
Final thoughts
Through this tutorial you learned how to free up disk space on Ubuntu through concrete steps. You have now the useful commands to take in control disk usage on your Ubuntu computers.